" fill-opacity=".3" d="M0-111h1200v397s-252.211 51.289-538.449 54C375.312 342.711 0 292 0 292v-403Z"/%3E%3Cpath fill="url(%23b)" d="M1-114h1199v378s-252 51.289-538 54C376 320.711 0 270 0 270v-384Z"/%3E%3Cpath fill="url(%23c)" d="M0 60h1200v188s-327 63.289-613 66C301 316.711 0 273 0 273V60Z"/%3E%3Cpath fill="url(%23d)" d="M0 60h1200v188s-327 63.289-613 66C301 316.711 0 273 0 273V60Z"/%3E%3Cmask id="e" width="1201" height="255" x="-1" y="60" maskUnits="userSpaceOnUse" style="mask-type:alpha"%3E%3Cpath fill="%23EEF1F6" d="M0 60h1200v188s-327 63.289-613 66C301 316.711 0 273 0 273V60Z"/%3E%3C/mask%3E%3Cg mask="url(%23e)"%3E%3Cmask id="g" width="1438" height="328" x="-124" y="-13" maskUnits="userSpaceOnUse" style="mask-type:alpha"%3E%3Cpath fill="url(%23f)" fill-rule="evenodd" d="M-123.5 258.5-109-13h1395l27.5 245c-232.5 34.5-487.705 80.384-725.581 83-237.486-2.721-265.419-4-711.419-56.5Z" clip-rule="evenodd"/%3E%3C/mask%3E%3Cg mask="url(%23g)"%3E%3Cpath fill="%23FEF3C7" fill-opacity=".05" d="M774.502 1161.55c72.001-3.83 144.529-16.6 217.321-38.74C1514.56 964.017 1919.92 369.717 2099-392.74 1846.08 72.142 1341.28 313.096 774.502 323.314 207.726 312.671-296.808 72.141-549.998-392.74-370.919 369.717 34.449 964.017 557.181 1122.81c72.792 21.71 145.32 34.48 217.321 38.74Z"/%3E%3Cpath fill="%232070E8" fill-opacity=".25" d="M1243.34 184.225c102.44 30.548 204.48 74.055 305.68 131.036C2275.79 724.198 2778.24 1714.59 2935.35 2866.48 2634.05 2114.1 1943.59 1594 1134.58 1382.03 322.864 1199.88-429.69 1367.89-852 1944.02-497.039 916.86 159.636 208.787 927.603 163.907c106.887-5.677 212.247 1.329 315.737 20.318Z"/%3E%3Cpath fill="%23FEF3C7" fill-opacity=".05" d="M1232.5 70.76c104.07 5.535 208.91 23.986 314.13 55.967C2302.21 356.131 2888.15 1214.7 3147 2316.21 2781.41 1644.6 2051.75 1296.5 1232.5 1281.74 413.251 1297.12-316.027 1644.6-682.001 2316.21-423.151 1214.7 162.788 356.131 918.372 126.727 1023.59 95.361 1128.43 76.91 1232.5 70.76Z"/%3E%3Cpath fill="%23154A99" fill-opacity=".29" d="M421.155 420.269c113.733 46.994 226.413 108.503 337.53 185.053C1556.67 1154.75 2075.77 2329.98 2199.28 3644.03 1895.3 2761.18 1143.24 2091.29 243.733 1753.08c-903.919-305.05-1757.473-209.22-2258.663 386.12C-1568.66 1028.61-797.982 313.945 67.226 358.413c120.398 6.829 238.484 27.723 353.929 61.856Z"/%3E%3C/g%3E%3C/g%3E%3Cdefs%3E%3ClinearGradient id="a" x1="600" x2="600" y1="-92" y2="449" gradientUnits="userSpaceOnUse"%3E%3Cstop offset=".336" stop-color="%23007EE5"/%3E%3Cstop offset="1" stop-color="%2363D9EA"/%3E%3C/linearGradient%3E%3ClinearGradient id="b" x1="600.5" x2="600.5" y1="-114" y2="427" gradientUnits="userSpaceOnUse"%3E%3Cstop offset=".336" stop-color="%23007EE5"/%3E%3Cstop offset="1" stop-color="%2363D9EA"/%3E%3C/linearGradient%3E%3ClinearGradient id="c" x1="647" x2="647" y1="60" y2="319" gradientUnits="userSpaceOnUse"%3E%3Cstop offset=".052" stop-color="%23007EE5"/%3E%3Cstop offset=".514" stop-color="%231561D4"/%3E%3Cstop offset=".938" stop-color="%2300A0B5"/%3E%3C/linearGradient%3E%3ClinearGradient id="d" x1="647" x2="647" y1="60" y2="319" gradientUnits="userSpaceOnUse"%3E%3Cstop offset=".282" stop-color="%23007EE5" stop-opacity="0"/%3E%3Cstop offset=".822" stop-opacity=".3"/%3E%3C/linearGradient%3E%3ClinearGradient id="f" x1="588.5" x2="588.5" y1="-13" y2="499.532" gradientUnits="userSpaceOnUse"%3E%3Cstop stop-color="%23154A99"/%3E%3Cstop offset="1" stop-color="%2363D9EA"/%3E%3C/linearGradient%3E%3C/defs%3E%3C/svg%3E)
In our last installment (It Takes More Than the Occasional Wash and Wax to Keep Your Car Looking its Best), we covered the basics on getting that showroom shine back to your vehicle's finish. In our second of three installments, we're going to take care of your vehicle's living room -- the interior.
If you're like most of us with hectic schedules, we wash our cars periodically, but normally don't have the time to vacuum the interior, let alone clean it. For most commuters and small families, the interior becomes the common dumping ground for all sorts of items, and a treasure-trove for junk collectors. So let's grab that trusty vacuum and get to work.
As before, there are some simple rules to remember. First, always have the car parked in a cool, shady place when you're cleaning the interior. Direct sunlight can bake cleaners into the upholstery, which will pull the natural oils out of leather.
Second, be sure to have a good stock of 100 percent cotton, terry cloth towels on hand for applying and removing detail products (the "nap" of terry cloth towels helps draw dirt and other contaminates away from the surface, thus minimizing the chance of grinding dirt back into the interior surfaces).
Third, you want to be sure to utilize the correct products at the correct stages to prevent unnecessary damage to your car's interior. Trying to "protect" your leather seats with plastic polish will only lead to a big mess.
The first order of business is getting all of the crud out of the interior - loose gas-card receipts, gum wrappers, toys and the handful of parking tickets that have been hiding under the seat - anything that is too large to vacuum up or you want to save. Don a pair of rubber gloves if you need to and pull it all out. Of course, you'll probably find at least $4.68 in loose change, along with the McDonald's wrappers and ground-to-death French fries you intended to throw away three months ago.
With all of the large debris removed, take some time to evaluate the condition of your interior. Is it primarily dusty with a stain or two in the carpet, or are food stains, pet odors and ground-in dirt more prevalent? Assess the damage and let's start cleaning.
Starting from the top down, attach the soft brush attachment to the vacuum and start with the dash, headliner, gauges and console. You want to use a gentle "stroking" motion with the brush. This will loosen most of the surface dirt, which is readily sucked up. If the headliner is heavily grubby, consult with a detailing professional. Most headliner adhesives do not react well to cleaners and the last thing you want is a droopy headliner. After vacuuming, wipe the dash, gauges and console with a damp terry cloth towel in a circular motion. This will help to remove any additional surface dirt prior to deep cleaning.
If you're like most people on the go, the cupholders in your vehicle see more mileage than the tires...and they get just as dirty. Depending if your cupholders are swing-away or molded into the console, cleaning the holders can be a breeze or a pain. Either way, the process is still the same. Since most of us drink sodas while driving, cupholders tend to get covered with sticky soda goop. To cut through the cola sludge, mix a batch of Simple Green and water in a 1:4 ratio. Spray the cupholder and allow the mixture to soak in before wiping with a terry cloth towel. Depending on how gooey the holders are, you may have to give them another round of cleaning. Be sure to wipe the cupholder with a damp terry towel (water) and then dry.
Move on to the front seats, package tray and rear seats, using the same technique as before to take the bulk of the dust and dirt off the seating surfaces. To get in the nooks and crannies in and around the seats, console and transmission tunnel (you know, where those doughnut chunks tend to hide), attach the crevice tool (that long needle-nose looking thing) and have at it.
In most cases (that is, if you're lucky), the floor mats have taken the brunt of the interior's wear and tear from dirty shoes, spilled drinks and road grime. Vacuum the mats well with the carpet-comb attachment and remove them from the car. Shoe scuffs on the door panels are another area which is quickly remedied by our Simple Green mixture. Simply spray the product on the door panel and scrub with a soft scrub brush. Rinse with clean water when done.
Now let's turn our attention to the swath of carpet. Using the carpet-comb tool, vacuum as much dirt and...well, other stuff, as you can, taking note of those tie-dyed areas of coffee, Coke and melted ice cream. If the stains on the carpet and floor mats are small, or the stains are light, a "spray, scrub and vacuum" product such as 3M Scotchgard Carpet Cleaner will more than likely do the trick. Follow the manufacturer's directions for best results. If the area is large, or the stains are more obvious, it's best to break out a professional carpet-cleaning machine.
Cleaning your carpet and floor mats with a machine is not rocket science. The machine "infuses" the carpet with the cleaning solution, breaking down the dirt particles and forcing them out of the carpet. At the same time, the machine vacuums the dirty water mixture out of the carpet, leaving it fresh and clean.
If you don't own a carpet-cleaning machine (like a Bissell Little Green Machine), you can rent one at your local supermarket or rental agency. Since most machines infuse the carpet with cleaner and water, be sure to get a good quality cleaning solution. If in doubt, ask a sales associate for assistance.
Qwik Tip: Cranberry stains are the toughest to get out, but a little home remedy works wonders. Sprinkle salt onto half of a lemon and scrub the stain with the salted lemon. The stain will come out with only a few strokes.
Once the carpet is cleaned, turn your attention to cleaning the dash and seating surfaces. If your vehicle has leather, use a quality leather cleaner such as Lexol-ph Leather Cleaner or Mothers Leather Cleaner. If possible, try to use separate cleaners and conditioners, rather than an all-in-one product. This allows for deep cleaning and maximum protection of the leather.
Leather cleaners generally come in two forms: spray and liquid paste. The spray types are usually a spray-on, wipe-off affair. Liquid forms must be "massaged" into the leather to be effective. In either case, follow the manufacturer's directions for proper application.
After cleaning, you'll need to condition the leather and dash in order to restore the natural oils and retain its original suppleness and deter aging. Using small, circular strokes, massage the conditioner into the leather. Allow the conditioner to be absorbed by the leather before buffing off the excess. Quality leather conditioners include Lexol's Leather Conditioner and Mothers Leather Conditioner.
Over the past few years, cloth seats have become more and more resistant to staining, thanks in part to new formulations in fabric treatment, which were originally developed by the 3M company in the 1980s. The use of "Scotchgarding" (a trade term for 3M's Scotchgard product) provides a barrier to help repel water and oil-based contaminants from permanently staining cloth and velour fabrics.
Cleaning a stain-resistant cloth interior is relatively easy, compared to cleaning a leather interior. Nearly all cleaning products for cloth interiors are produced as an "all-in-one" cleaner and protectant, in spray, scrub and wipe/vacuum form, such as 3M Scotchgard Cleaner and Protector. As before, always follow the manufacturer's directions for proper application.
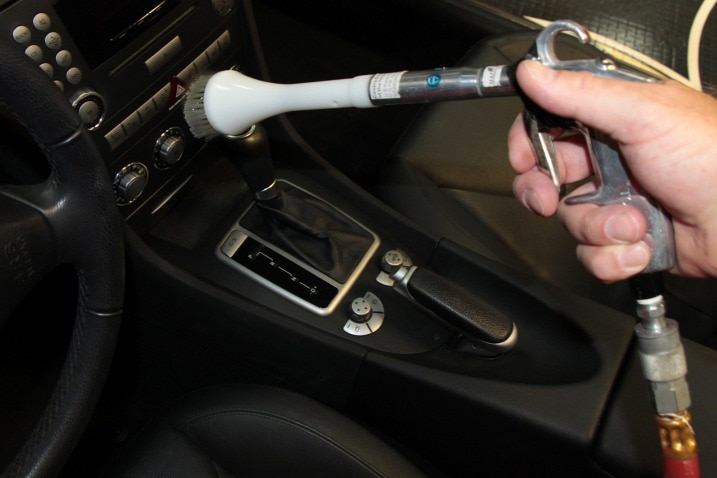
Getting the dust and dirt that accumulates in the crevices of climate and radio controls is easy with a couple of household tools. First, dampen a half-inch paintbrush by lightly spraying Endust onto one side of the brush and "knock" it once against your hand to distribute the product evenly. Now, dust will adhere to the brush as you wipe it over the controls. For air vents, utilize a cotton swab in the same manner.
If you've ever dry-wiped the dust and dirt away from your instrument cluster, chances are you've also scratched the clear lexan that covers the gauges. Using a small amount of Meguiar's Plastic Polish, buff the scratches out using small circular strokes with a terry cloth towel. After the polish begins to "haze-up," buff the residue off of the lens with a fresh terry towel.
Finally, we need to tackle the windows. While there's a plethora of products available to clean your automotive greenhouse nothing beats good old Windex. Spray the product on the window to be cleaned and wipe with a clean terry towel, flipping the towel to prevent streaking. If your windows are tinted, use distilled water only, as the ammonia in the Windex can "pit" the tinting film.
While cleaning the interior of your car may not be high on the list of priorities, a fresh interior will not only add to the resale value of your vehicle later down the road, but also impress that Saturday night date at Lover's Lane.
For additional information on the products suggested above, contact Mothers polishes, waxes and cleaners at www.mothers.com, 3M products at www.3m.com, Simple Green at www.simplegreen.com, Windex at www.scjbrands.com and Bissell Homecare Products at www.bissell.com.

 by
by